Showing posts with label Fall. Show all posts

Monday, November 11, 2013

Fall


well hello there, how was your week? I had a little bit of an off week, not feeling totally well and definitely not feeling a lot of energy. probably the rain didn't help to fix that. although the weekend was mostly bright and sunny, and therefore quite cheerful. great timing by the chimney sweeper too, who made our fireplace ready and oh what joy the fire and the warmth give. in front of it, I worked on the pattern for the fingerless gloves, and hope to upload a second pattern this Wednesday. 

I enjoyed playing with some patterns from the HEMA Breiboek and over the weekend I happily started a pattern from the colourful new Dutch crochet book Haken en Kleur, by my crochet friends Claire and Saskia, from the blogs Haken en Meer and Saar en Mien. more about that tomorrow!

wishing you a great week of Fall xo

Tuesday, November 5, 2013

Berlin


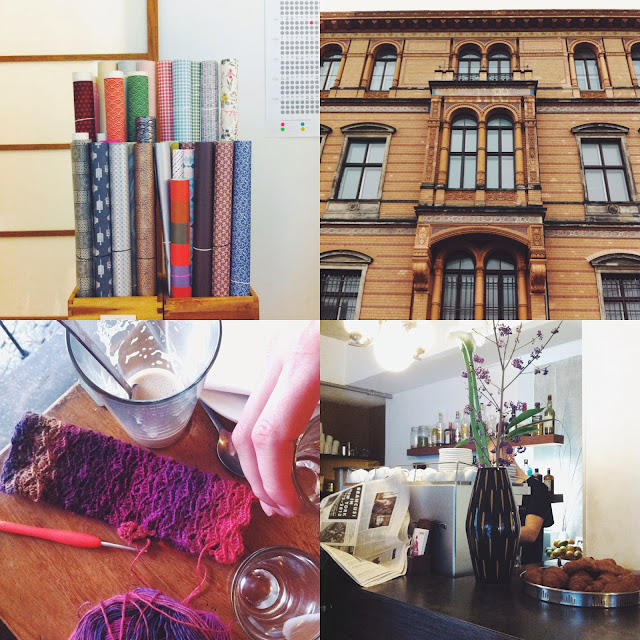
a weekend of Fall in Berlin. mostly wet, quite some wind too. loads of beautiful coloured leafs and a little bit of sunshine. quite a rough and tough city we found, a charm and style of it's own.


lots of delicious coffee and accompanying treats to warm up


a tour in the glass dome of the Reichstag, very interesting and beautiful with amazing Berlin view


a typical Berlin Sunday afternoon Flohmarkt, slowly getting in Christmas mood


Berlin. a very short visit. it turns out to be a huge city. not jut big. huge. my advice would definitely be to book at least 5 days. there's a great public transport network that never makes you wait more then 4 minutes for the next train, bus or subway. absolutely perfect. and you need it to travel between the nice areas, they're just too far apart to walk. you'll be walking a lot anyway, that's for sure.

with the help of Sandra, Holly and Nathalie we were able to make a selection and focus on a small part of the city: the areas Mitte and a bit of Prenzlauer Berg. 

a few spots I'd like to recommend based on our own visits:
* cute little shop and paper goodies at R.S.V.P. with an online shop too. I got the coloured stickers and a cute notebook there as you can see in the image above
* delicious coffee at The Barn and Lois, absolutely perfect carrot cake at The Barn
* great bookstore with a fabulous selection of international magazines do you read me?!
* dinner at restaurant Lokal where everything you eat and drink is provided by local suppliers and truly delicious
* all over Germany there are Muji shops. I saw their shop for the first time in New York and just love their simple Japanese designs and cute Christmas collection

I found two yarn shops. Loops was too far away for us to walk and we ran out of time to visit. knit knit was closed by the time we accidentally walked by it. can you believe it?! I did not visit one yarn shop in Berlin. aaaaah. definitely have to go back!

keep in mind most shops are closed on Sundays. cash is what you need in most places. get a public transport ticket and comfortable walking shoes to get around. most people speak English and are very helpful. if you'd like to visit the Reichstag dome, keep in mind registration in advance is required.

Enjoy!


Monday, November 4, 2013

Last Weekend


husband baked a delicious apple pie ~ great day with Dutch-Canadian friends in Utrecht ~ finished glove and a hand that wishes coffee would arrive by itself

road trip to Berlin with quite some beautiful detour routes due to traffic

what we did in rainy Berlin: visiting beautiful shops and finishing a second glove

…drinking delicious coffee, eating delicious food and enjoying the view

we spent last weekend in Berlin. more about that in tomorrow's blog post. 

also last weekend: my dear friends Claire from Haken en Meer and Saskia from Saar en Mien presented their first crochet book Haken & Kleur and did so well. congratulations girls on this beautiful book and great fabulous response already. I can't wait to get mine in the mail and tell you all about it! have you got your copy yet?

enjoy a new week ~ I hope it's less rainy where you are

Friday, August 30, 2013

Joining Crochet Squares ~ Tutorial


thank you for your sweet comments on my post yesterday with the pattern for these puff stitch squares. today I would like to show you a possible method to join the squares 'on the go'. this means you don't make all the squares up front and join them in once. instead you will make them one by one and join them immediately to the item you are making. what I like about this joining method is that by the time you've finished all your squares, your item is finished too. instant gratification at the end! also, no loose squares lying around in your house, in several project bags and such. 
just like with the other pattern, please be reminded that I am left handed and accordingly my patterns work clockwise. the pattern works exactly the same if you are right handed, however you will work from left to right and counter clock wise. if there's a mistake in the pattern or something is unclear to you, please let me know through a comment below or send me an email.

crochet pattern tutorial on joining puff stitch squares
in both English and Dutch, images from left handed perspective

all right, let's get joining. the yarn I used is a nice cotton called Drops Paris, I picked the following colours: #16 white, #27 peach, #41 mustard and #48 petrol.

1 ~ after you have finished your first square according to this pattern, make a second one up to the double crochet and treble crochet for the first corner like in image 1. don't do the chain stitch for the corner, since you will use that stitch to attach the second square to the first square. ~ 2 ~ attach the squares: slip stitch in the corner of the first square, continue with the corner stitch making treble crochet, double crochet. continue with *slip stitch in the next gap in the first square, 2 double crochet in the next gap in the second square*, repeat between * twice, slip stitch in the next gap in the first square. please note, I choose to make a slip stitch for joining since this cotton will stretch when used and I don't like the gaps to become larger. also, I like the hand sewn look you get with this slip stitch. however, if you are a tight crocheter, prefer larger gaps or don't like the hand sewn look, you are welcome to replace the slip stitches for joining in this entire pattern with single crochet.
1 ~ nadat je het eerste vierkant gemaakt hebt volgens dit patroon, maak het tweede vierkant tot de buitenrand met het eerste deel van de hoek, stokje en dubbel stokje zoals in plaatje 1. haak geen losse voor de hoek, omdat je die steek gaat gebruiken om de vierkanten aan elkaar te zetten. ~ 2 ~ zet de vierkanten aan elkaar door een halve vaste in de hoek van het eerste vierkant te haken, vervolgens maak je de hoek af met een dubbel stokje en stokje. ga verder met *halve vaste in de volgende opening in het eerste vierkant, 2 stokjes in de volgende opening in het tweede vierkant*, herhaal tussen * 2 keer, halve vaste in de volgende opening in het eerste vierkant. in dit patroon heb ik er voor gekozen de vierkanten aan elkaar te haken met halve vasten omdat deze katoen zal rekken over tijd en ik niet wil dat de gaten dan groter worden. ik vind de halve vaste ook een mooie steek maken, een beetje alsof het met naald en draad aan elkaar gezet is. mocht je erg strak haken, de gaten juist leuk vinden of die hand genaaide look niet mooi vinden, voel je vrij om in dit hele patroon de halve vasten te vervangen voor vasten.

3 ~ make another corner * double crochet, treble crochet in the next gap in the second square, slip stitch in the corner of the first square, treble crochet and double crochet in the same gap in the second square*. the joint will look like image 4 now. now continue finishing the square like you did with the first square as of image 10 of this pattern 
3 ~ maak weer een hoek *stokje, dubbel stokje in de volgende opening in het tweede vierkant, halve vaste in de hoek in het eerste vierkant, dubbel stokje, stokje in dezelfde opening in het tweede vierkant* .  de aan elkaar gehaakte vierkanten zien er nu uit zoals in plaatje 4. maak nu het vierkant af zoals je deed met het eerste vierkant vanaf plaatje 10 van dit patroon

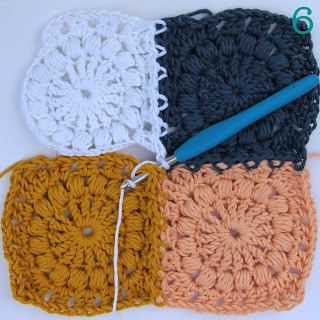
5 ~ continue attaching squares like you did above, for as long as you like the row of squares to be. on the second row you will attach the third square like you did with the second one; on a side of the first square as in image 5. ~ 6 ~ to attach the fourth and following squares, you have to deal with a new corner stitch. if you were to make just two slip stitches in the corners of the third and second square, you will get a diagonal line as shown in the circle in the image below. since I am working with contrasting colours in this pattern, I find the line a little disturbing. I know, I can be tough when it comes to details :). if you don't mind the line, just make one slip stitch in each corner and continue with treble and double crochet to finish the corner of the fourth square. if you don't want the diagonal line, work as follows. after the first part of the corner stitch double and treble crochet, make a slip stitch in the corner of the third square. move the thread behind your work, insert the hook in the corner of the second square and yarn over. look at image 6 for your current position
5 ~ maak zoveel vierkanten in een rij aan elkaar als je wilt, zoals je in bovenstaande stappen gedaan hebt. als je begint met de tweede rij maak je het derde vierkant vast aan het eerste vierkant zoals je met het tweede vierkant gedaan hebt, zoals in plaatje 5. ~ 6 ~ om het vierde vierkant vast te maken heb je te maken met een nieuwe hoeksteek. als je in de hoeken van het derde en tweede vierkant een halve vaste maakt, krijg je een diagonale lijn te zien zoals in het plaatje hieronder. omdat ik met contrasterende kleuren werk in dit voorbeeld vind ik de lijn storend. ik weet het, ik let op de details :). als je die lijn niet storend vindt maak je dus een halve vaste in de hoek van het derde en tweede vierkant en vervolgens maak je de hoek van het vierde vierkant af met een dubbel stokje en stokje in de hoek. als je de diagonale lijn niet mooi vindt, maak je een halve vaste in de hoek van het derde vierkant. verplaats de draad naar achteren, steek de naald in de hoek van het tweede vierkant en haal de draad om de naald. het ziet er nu uit zoals op plaatje 6


7 ~ pull the hook through the corner and yarn over twice for your treble crochet, it looks like image 7. ~ 8 ~ make the treble crochet by putting the corner gap of the fourth square, *yarn over, pull hook through 2 loops*, repeat once between *, yarn over. you now have 4 loops on your hook and it looks like image 8
7 ~ haal de naald door de hoek and haal de draad tweemaal om de naald voor het dubbele stokje, het ziet er nu uit zoals op plaatje 7. ~ 8 ~ maak het dubbele stokje door de naald in de hoek van het vierde vierkant te steken, haal de draad om de naald en terug door de hoek, *haal de draad om de naald en door 2 lussen*, herhaal tussen *, haal de draad om de naald. je hebt nu 4 lussen op de naald en het ziet er uit zoals plaatje 8

9 ~ pull the thread through all 3 loops on your hook, double crochet in the corner of the fourth square, slip stitch in the next gap of the second square and it looks like image 9. ~ 10 ~ continue finishing the attachment of the fourth square like you did with the other ones
9 ~ haal de draad in 1 keer door alle drie de lussen op de naald, maak een stokje in de hoek van het vierde vierkant en een halve vaste in de volgende opening van het tweede vierkant en dan ziet het er uit zoals op plaatje 9. ~ 10 ~ ga verder met het vastmaken van het vierde vierkant zoals je dat deed met de andere vierkanten

11 ~ and look at that, your squares are attached! 
11 ~ en kijk eens aan, je vierkanten zitten aan elkaar!


possibilities are endless, I am being enthusiastic and thinking a little lap blanket. how about the peachy pink on the left for the edging...? to be continued

wishing you a happy weekend!


Thursday, August 29, 2013

Crochet Square With Puff Stitch ~ Tutorial


yay a new pattern on my blog, it feels like ages ago since I posted one and it probably is. like I wrote yesterday, this pattern came around because a new friend on Instagram found a picture of a similar square and asked for help to figure out the pattern. this means there is a very similar pattern out here on the www and I would be the last to claim this to be a totally new square that has never been made before. all I know is I have never made one like this before, and I enjoyed figuring this one out based on a picture. round by round, trial and error, taking notes and pictures, with a pattern for you as a result. also, just to remind you or to tell you if you are new here, please take into account that I am left handed. that will not change the pattern at all, however it means in the images my squares build op clock wise. if you are right handed, your squares will build up counter clock wise.

having that all said, please let me know if there's a mistake in the writing or if something is unclear. 
I hope you'll enjoy this pattern!

crochet pattern tutorial for a puff stitch square
in both English and Dutch, images from left handed perspective

I used this opportunity to get a few balls of Drops Paris yarn. I know it is Annemarie's favourite yarn and it was about time I tried it too. Catania, the yarn I usually use, is cotton too but a mercerized cotton which therefore has a little shine. to give these squares a little more rustic and Fall feeling, Drops Paris seemed the perfect choice to me. crocheted on hook size H or 5 mm they become a nice size too.

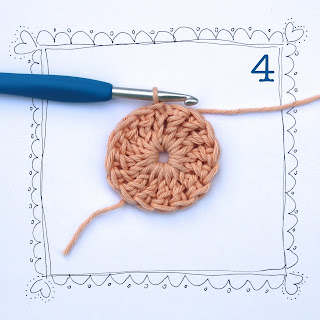
what you need: yarn with corresponding hook, scissors ~ 1 ~ make a chain of 5 chain stitches, close with slip stitch to a circle in first chain (slip stitch: put hook through stitch, yarn over and pull through stitch and both loops on hook in once)
wat je nodig hebt: garen met bijpassende haaknaald, schaar ~ 1 ~ maak een ketting van 5 losse, maak ze aan elkaar tot een ring met een halve vaste in de eerste losse (halve vaste: steek de naald in een steek, haal de draad om de naald, haal de naald terug door de steek en door beide lussen op de naald)

2 ~ chain 3, counts as one treble crochet. ~ 3 ~ make 15 treble crochet in the ring, for a total count of 16 (treble crochet: yarn over twice, insert hook in circle yarn over and pull through, *yarn over and pull through 2 loops on hook* (repeat between * twice twice)
~ 2 ~ 3 losse, telt als je eerste dubbel stokje ~ 3 ~ maak 15 dubbele stokjes in de ring, je hebt er nu 16 in totaal (dubbel stokje: haal de draad 2 keer over de naald, steek de naald in de ring haal de draad over de naald en de naald naar voren, *haal de draad over de naald en door 2 lussen op de naald* (herhaal tussen * 2 keer)

4 ~ close this round with a slip stitch in the 3rd chain of the first stitch ~ 5 ~ start the round of the puff stitches with a slip stitch in the next treble crochet, pull this loop a little as shown in the picture
4 ~ eindig deze ronde met een halve vaste in de derde losse van de eerste steek ~ 5 ~ begin de ronde van de puff stitches met een halve vaste in het volgende dubbele stokje, rek deze lus op de naald een beetje zoals op het plaatje

6 ~ make a puff stitch in every stitch, alternated by 2 chain stitches. puff stitch: *yarn over, put hook through stitch, yarn over and pull through stitch*, repeat between * 3 times, yarn over (your stitch should look like image 6), pull yarn through all loops in once, chain 2 and it should look like in image 7 ~
6 ~ maak een puff stitch in elke steek, afgewisseld met 2 losse. puff stitch: *haal de draad over de naald, de naald in de steek, draad over de naald en terug door de steek*, herhaal tussen * 3 keer, haal de draad over de naald (je steek ziet er nu uit zoals in plaatje 6), haal de draad in een keer door alle lussen op de naald, haak 2 losse en dan ziet je steek er uit als op plaatje 7 ~

8 ~ continue with the puff stitches alternated by 2 chains all around until you have 16 puff stitches, the last one being a little tight. after the last one, chain 2. ~ 9 ~ close this round with a slip stitch in the top of the first puff stitch
8 ~ maak de ronde af met puff stitches afgewisseld met 2 losse totdat je 16 puff stitches hebt, de laatste zal een beetje strak zijn. maak 2 losse ~ 9 ~ sluit deze ronde met een halve vaste in de steek bovenop de eerste puff stitch

10 ~ start the new round with a slip stitch into the next gap between the puff stitches, chain 2 which counts as a double crochet, double crochet in the same gap, chain 1. *2 double crochet in the next gap, chain 1*, repeat between * once. this makes for one side of the square. ~ 11 ~ make the corner out of *double crochet, treble crochet, chain 1, treble crochet, double crochet* chain 1
10 ~ begin de nieuwe ronde met een halve vaste in het volgende gat tussen de puff stitches, 2 losse die tellen als een stokje, haak een stokje in hetzelfde gat, 1 losse. *2 stokjes in het volgende gat, 1 losse*, herhaal tussen * 1 keer. dit is een zijkant van het vierkant. ~ 11 ~ maak een hoek uit de volgende combinatie van steken * stokje, dubbel stokje, losse, dubbel stokje, stokje* en een losse

12 ~ continue with *2 double crochet, 1 chain* and repeat twice, make corner, chain, repeat between * 3 times, make corner, chain one, repeat between * 3 times, make corner. your square should look like image 12 now. let the bird cut your thread, with the hook pull yarn through and out
12 ~ ga door met *2 stokjes, losse* en herhaal 2 keer, haak een hoek en een losse, herhaal tussen * 3 keer, haak een hoek en een losse, herhaal tussen * 3 keer, haak een hoek. het vierkant ziet er nu uit zoals op plaatje 12. laat de vogel je draad doorknippen en trek met de naald de draad door de steek en er uit


13 ~ to finish off like a chain stitch in between the corner and the first cluster of double crochet: from the front, put the hook through the second chain of the first stitch like in image 13. yarn over and pull through the stitch. ~ 14 ~ insert hook from above in the middle of the last double crochet stitch of the corner, yarn over and pull through the stitch. and your square is finished!
13 ~ om her vierkant te eindigen met een losse tussen de hoek en de eerste stokjes: steek de naald van voren in de tweede losse van de eerste steek, net zoals op plaatje 13. haal de draad om de naald en door de steek. ~ 14 ~ steek de naald nu van boven midden in de laatste vaste van de hoek, haal de draad om de naald en door de steek. en je vierkant is af!


click here for the tutorial on how to join the squares