

thank you for your sweet comments on my post yesterday with the pattern for these puff stitch squares. today I would like to show you a possible method to join the squares 'on the go'. this means you don't make all the squares up front and join them in once. instead you will make them one by one and join them immediately to the item you are making. what I like about this joining method is that by the time you've finished all your squares, your item is finished too. instant gratification at the end! also, no loose squares lying around in your house, in several project bags and such.
just like with the other pattern, please be reminded that I am left handed and accordingly my patterns work clockwise. the pattern works exactly the same if you are right handed, however you will work from left to right and counter clock wise. if there's a mistake in the pattern or something is unclear to you, please let me know through a comment below or send me an email.
crochet pattern tutorial on joining puff stitch squares
in both English and Dutch, images from left handed perspective
all right, let's get joining. the yarn I used is a nice cotton called Drops Paris, I picked the following colours: #16 white, #27 peach, #41 mustard and #48 petrol.


1 ~ after you have finished your first square according to this pattern, make a second one up to the double crochet and treble crochet for the first corner like in image 1. don't do the chain stitch for the corner, since you will use that stitch to attach the second square to the first square. ~ 2 ~ attach the squares: slip stitch in the corner of the first square, continue with the corner stitch making treble crochet, double crochet. continue with *slip stitch in the next gap in the first square, 2 double crochet in the next gap in the second square*, repeat between * twice, slip stitch in the next gap in the first square. please note, I choose to make a slip stitch for joining since this cotton will stretch when used and I don't like the gaps to become larger. also, I like the hand sewn look you get with this slip stitch. however, if you are a tight crocheter, prefer larger gaps or don't like the hand sewn look, you are welcome to replace the slip stitches for joining in this entire pattern with single crochet.
1 ~ nadat je het eerste vierkant gemaakt hebt volgens dit patroon, maak het tweede vierkant tot de buitenrand met het eerste deel van de hoek, stokje en dubbel stokje zoals in plaatje 1. haak geen losse voor de hoek, omdat je die steek gaat gebruiken om de vierkanten aan elkaar te zetten. ~ 2 ~ zet de vierkanten aan elkaar door een halve vaste in de hoek van het eerste vierkant te haken, vervolgens maak je de hoek af met een dubbel stokje en stokje. ga verder met *halve vaste in de volgende opening in het eerste vierkant, 2 stokjes in de volgende opening in het tweede vierkant*, herhaal tussen * 2 keer, halve vaste in de volgende opening in het eerste vierkant. in dit patroon heb ik er voor gekozen de vierkanten aan elkaar te haken met halve vasten omdat deze katoen zal rekken over tijd en ik niet wil dat de gaten dan groter worden. ik vind de halve vaste ook een mooie steek maken, een beetje alsof het met naald en draad aan elkaar gezet is. mocht je erg strak haken, de gaten juist leuk vinden of die hand genaaide look niet mooi vinden, voel je vrij om in dit hele patroon de halve vasten te vervangen voor vasten.


3 ~ make another corner * double crochet, treble crochet in the next gap in the second square, slip stitch in the corner of the first square, treble crochet and double crochet in the same gap in the second square*. the joint will look like image 4 now. now continue finishing the square like you did with the first square as of image 10 of this pattern
3 ~ maak weer een hoek *stokje, dubbel stokje in de volgende opening in het tweede vierkant, halve vaste in de hoek in het eerste vierkant, dubbel stokje, stokje in dezelfde opening in het tweede vierkant* . de aan elkaar gehaakte vierkanten zien er nu uit zoals in plaatje 4. maak nu het vierkant af zoals je deed met het eerste vierkant vanaf plaatje 10 van dit patroon

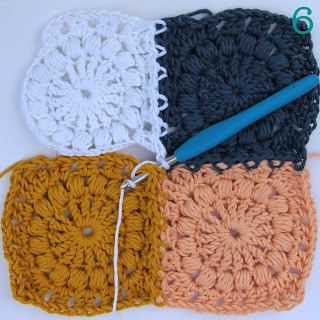
5 ~ continue attaching squares like you did above, for as long as you like the row of squares to be. on the second row you will attach the third square like you did with the second one; on a side of the first square as in image 5. ~ 6 ~ to attach the fourth and following squares, you have to deal with a new corner stitch. if you were to make just two slip stitches in the corners of the third and second square, you will get a diagonal line as shown in the circle in the image below. since I am working with contrasting colours in this pattern, I find the line a little disturbing. I know, I can be tough when it comes to details :). if you don't mind the line, just make one slip stitch in each corner and continue with treble and double crochet to finish the corner of the fourth square. if you don't want the diagonal line, work as follows. after the first part of the corner stitch double and treble crochet, make a slip stitch in the corner of the third square. move the thread behind your work, insert the hook in the corner of the second square and yarn over. look at image 6 for your current position
5 ~ maak zoveel vierkanten in een rij aan elkaar als je wilt, zoals je in bovenstaande stappen gedaan hebt. als je begint met de tweede rij maak je het derde vierkant vast aan het eerste vierkant zoals je met het tweede vierkant gedaan hebt, zoals in plaatje 5. ~ 6 ~ om het vierde vierkant vast te maken heb je te maken met een nieuwe hoeksteek. als je in de hoeken van het derde en tweede vierkant een halve vaste maakt, krijg je een diagonale lijn te zien zoals in het plaatje hieronder. omdat ik met contrasterende kleuren werk in dit voorbeeld vind ik de lijn storend. ik weet het, ik let op de details :). als je die lijn niet storend vindt maak je dus een halve vaste in de hoek van het derde en tweede vierkant en vervolgens maak je de hoek van het vierde vierkant af met een dubbel stokje en stokje in de hoek. als je de diagonale lijn niet mooi vindt, maak je een halve vaste in de hoek van het derde vierkant. verplaats de draad naar achteren, steek de naald in de hoek van het tweede vierkant en haal de draad om de naald. het ziet er nu uit zoals op plaatje 6


7 ~ pull the hook through the corner and yarn over twice for your treble crochet, it looks like image 7. ~ 8 ~ make the treble crochet by putting the corner gap of the fourth square, *yarn over, pull hook through 2 loops*, repeat once between *, yarn over. you now have 4 loops on your hook and it looks like image 8
7 ~ haal de naald door de hoek and haal de draad tweemaal om de naald voor het dubbele stokje, het ziet er nu uit zoals op plaatje 7. ~ 8 ~ maak het dubbele stokje door de naald in de hoek van het vierde vierkant te steken, haal de draad om de naald en terug door de hoek, *haal de draad om de naald en door 2 lussen*, herhaal tussen *, haal de draad om de naald. je hebt nu 4 lussen op de naald en het ziet er uit zoals plaatje 8


9 ~ pull the thread through all 3 loops on your hook, double crochet in the corner of the fourth square, slip stitch in the next gap of the second square and it looks like image 9. ~ 10 ~ continue finishing the attachment of the fourth square like you did with the other ones
9 ~ haal de draad in 1 keer door alle drie de lussen op de naald, maak een stokje in de hoek van het vierde vierkant en een halve vaste in de volgende opening van het tweede vierkant en dan ziet het er uit zoals op plaatje 9. ~ 10 ~ ga verder met het vastmaken van het vierde vierkant zoals je dat deed met de andere vierkanten

11 ~ and look at that, your squares are attached!
11 ~ en kijk eens aan, je vierkanten zitten aan elkaar!

possibilities are endless, I am being enthusiastic and thinking a little lap blanket. how about the peachy pink on the left for the edging...? to be continued
wishing you a happy weekend!
Hele duidelijke uitleg Maaike! Mooie kleuren, vooral petrol en mustard.
ReplyDeleteIk ben heel benieuwd hoe het wordt met de peachy-pink-rand!
Fijn weekend,
groetjes, Nathaly
Hello, I recently started making this blanket and unfortunately I have already started making the squares and did not see the way you joined them until I had already made quite a few. Is there another good way to join these squares that you know of? Love the blanket and the pattern, thanks so much for sharing...and the color combination are lovely.
ReplyDeleteHello, joining the squares after they are done is possible by putting the squares right-sides together and crocheting them with single crochet in every stitch together, picking up the loops of both squares. If you like the look of a little line in between the squares, you could crochet them together facing wrong sides, and pick up the outside loop of both squares.
DeleteAnother option is to sew them together with a darning needle, also by going through the back loop of the squares when they are facing right sides together. I hope this helps! Happy crocheting