


the crochet pattern for the bobble stitch fingerless gloves, yay!
yarn: one skein Scheepjeswol Invicta colour #966
hook: size 3 mm
the images in this pattern are done with a different yarn that shows better. for a quick pattern guide and the crochet diagrams, scroll down.
when looking at the images, please keep in mind I am left handed.
1. chain 40, join into a ring with slip stitch in first chain, make sure to keep the chain straight not twisted, when you join
1. maak een ketting van 40 losse, sluit de ring met een halve vaste in de eerste losse, zorg ervoor dat de ketting in een ronde zonder draai zit wanneer je de ring sluit
2. chain 2, half double crochet in the next 39 stitches, join with slip stitch in second chain stitch. work round 2, 3 and 4 while facing the outside of the glove
2. 2 losse, half stokje in de volgende 39 steken, sluit met halve vaste in de tweede losse. haak rij 2,3 en 4 terwijl je naar de buitenkant van de handschoen kijkt
now try to fit the ring on your wrist. you can add stitches if it's too tight, or loose some stitches if it's too loose. add or loose in clusters of 2 stitches to keep the pattern in tact. keep in mind the glove will loosen a little bit after you start wearing it.
nu is een goed moment om de ring om je pols te passen. je kunt steken toevoegen als het te strak is, of steken minderen als het te wijd is. doe deze aanpassing in groepjes van 2 steken om het patroon in tact te houden. houd er rekening mee dat de handschoen nog een beetje zal rekken door het dragen.
in row 3 and 4, make sure to pick up the right 'stitch' as explained in picture 1 and 2 below, to make sure you get the nice line.
zorg ervoor in rij 3 en 4 dat je de juiste 'steek' oppakt om het randje te creëren, zie foto 1 en 2 hieronder.
3. same as row 2
3. hetzelfde als rij 2
4. same as 2
4. hetzelfde als rij 2


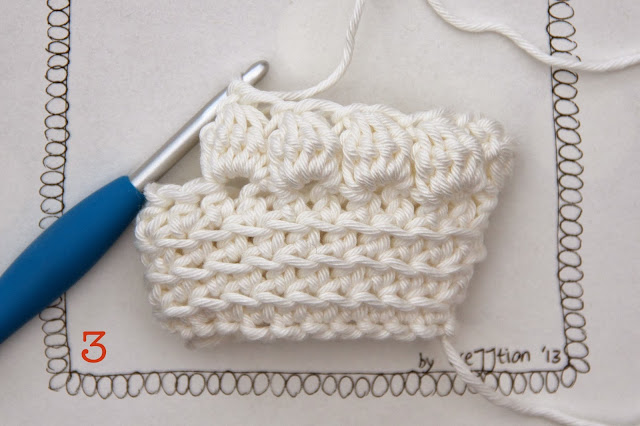
5. turn your work. you are now crocheting facing the inside of your glove, so the bobbles will pop out on the outside of the glove. chain of 3, *bobble stitch, chain, skip one* all around. bobble stitch is done as follows: make a double crochet and don't get to the final yarn over, pull through 2 stitches. it now looks like image 4 with 2 loops left on hook.
5. draai je werk, je haakt nu verder terwijl je naar de binnenkant van de handschoen kijkt, zodat de bobbels aan de buitenkant van de handschoen opbollen. ketting van 3 losse, *bobbel steek, losse, sla een steek over* rondom. de bobbel steek gaat als volgt: haak en stokje zonder de laatste keer draad over de naald en door de 2 lussen. het ziet er nu uit zoals op foto 4 met 2 lussen op de naald.

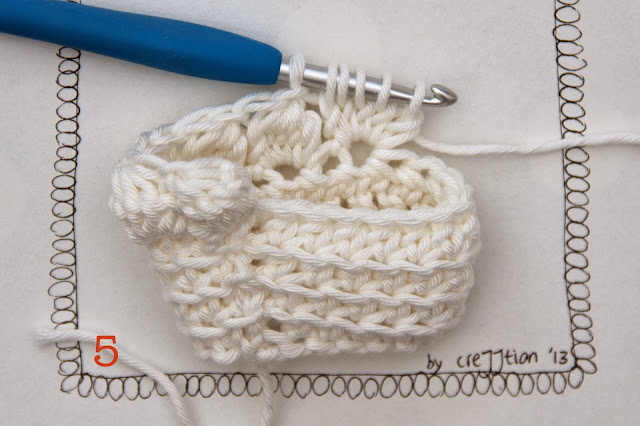

8. make sure to join the row of bobbles in the top of the first bobble stitch, as pointed out in image 7. crochet a slip stitch in that stitch and your row is finished, looking like image 8.
8. zorg ervoor dat je de rij sluit in de bovenkant van de eerste bobbelsteek, deze is aangemerkt op foto 7. haak een halve vaste in deze steek en je rij is klaar, het ziet er nu uit zoals op foto 8.


9. start a new row with 2 chain, followed by 39 half double crochet stitches. close with slip stitch in second chain. as in image 9.
9. begin een nieuwe rij met 2 losse, gevolgd door 39 halve stokjes. sluit met halve vaste in de tweede losse. zoals op foto 9.


6. repeat the double crochet 4 times and keep the last loop of every stitch on the hook, you now have 6 loops on hook as shown in image 5.
6. herhaal het stokje met de laatste lus nog op de naald 4 keer, je hebt nu 6 lussen op de naald zoals op foto 5.
7. yarn over and pull through all 6 loops in once. chain. it now looks like image 6.
7. haal de draad om de naald en door alle 6 lussen tegelijk. haak een losse. het ziet er nu uit zoals in foto 6.
8. make sure to join the row of bobbles in the top of the first bobble stitch, as pointed out in image 7. crochet a slip stitch in that stitch and your row is finished, looking like image 8.
8. zorg ervoor dat je de rij sluit in de bovenkant van de eerste bobbelsteek, deze is aangemerkt op foto 7. haak een halve vaste in deze steek en je rij is klaar, het ziet er nu uit zoals op foto 8.
9. start a new row with 2 chain, followed by 39 half double crochet stitches. close with slip stitch in second chain. as in image 9.
9. begin een nieuwe rij met 2 losse, gevolgd door 39 halve stokjes. sluit met halve vaste in de tweede losse. zoals op foto 9.
10. to make sure the bobbles alternate, crochet the next row of bobbles as follows. chain 3, *skip one, bobble stitch, chain* and repeat between * 3 times. skip one and crochet a fifth bobble and join with slip stitch in third chain. result shown in image 10.
10. om te zorgen dat de bobbels elkaar afwisselen in het patroon, haak de volgende rij als volgt. 3 losse, *1 overslaan, bobbel steek, losse* herhaal tussen * 3 keer. sla een steek over en haak een vierde bobbel, sluit met een halve vaste in de derde losse. het ziet er nu uit zoals op foto 10.

QUICK GUIDE PATTERN
all right, once you get the idea about the stitch into the right stitch and the bobble stitch, let's make this a quick pattern.
* crochet row 1 through 9 as shown in the diagram below and don't forget to turn your work for the rows of half double crochet
* repeat row 2 through 9 twice
* repeat row 2 through 6
SNELLE PATROON BESCHRIJVING
ok, nu je begrijpt hoe het werkt met het oppakken van de juiste steek en het maken van de bobbel steek, laten we er een snel en simpel patroon van maken.
*haak rij 1 t/m 9 zoals getekend in het diagram hieronder, vergeet niet je werk te draaien voor de rijen halve stokjes
*herhaal rij 2 t/m 9 twee keer
*herhaal rij 2 t/m en 6


crochet diagram for the first part of the glove, the bottom.
*the next rows are done by going back and forth instead of in the round, to create a gap for your thumb. 4 rows of bobble stitches, with 3 rows of half double crochet in between as shown in the diagram below. pay attention to how the row ends and beginnings are done, for alternating bobbles. in rows 1, 5, 9 and 13, start with 2 chain and 4 bobble stitches, which count as 5 for one bobble, end with a double crochet in the same stitch as the last bobble. in rows 3, 7, 11 and 15 start with 3 chain, skip one and make the first bobble in the next stitch, end with a bobble in the last stitch.
*de volgende rijen worden heen en terug gehaakt in plaats van in het rond, om ruimte te maken voor je duim. 4 rijen bobbel steken, met 3 rijen halve stokjes ertussen. let op hoe de rij einden en beginsteken gedaan zijn, voor de afwisselende bobbels. in de rijen 1, 5, 9 en 13, begin met 2 losse en 4 bobbelsteken die samen 1 bobbel van 5 vormen, eindig met een stokje in dezelfde steek als de laatste bobbel. in de rijen 3, 7, 11 en 15 begin met 3 losse, sla een steek over en begin dan met de eerste bobbel, eindig met een bobbel in de laatste steek.

* the final rows are worked in the round again. 3 times a row of half double crochet, alternated with 3 rows of bobble stitch according to row 4 through 9 in the first diagram close up. fasten off.
*de laatste rijen worden weer in het rond gehaakt. 3 keer een rij halve stokjes afgewisseld met een rij bobbel steek, volg rij 4 t/m 9 van het eerste diagram. werk de draadeinden weg.
now, if you'd like to crochet a little thumb, crochet a bobble stitch in the gap between every two bobbles of the glove. crochet 2 bobbles in the bottom of the gap. work 2 more rows of half double crochet alternated with bobble stitches. or as far as you'd like the thumb to go.
als je het leuk vindt om de handschoen een duimpje te geven, haak dan een bobbelsteek tussen iedere twee bobbels van de handschoen in de duimopening. in de onderkant van de opening haak je twee bobbels. haak vervolgens 2 rijen halve stokjes afgewisseld met 2 rijen bobbelsteken. of zo ver als je wilt dat de duim gaat.
and you are done! one more to go and you'll have warm cozy hands this Winter
enjoy your gloves! if you find strange things in the pattern, please contact me through a comment or email and I'll try my best to help you out.

Your gloves are so lovely, and you are so clever to be able to write a pattern and explain it like this! xx
ReplyDeletetof ! dank je wel !
ReplyDeleteBeautiful! Very cozy looking - I just love the texture you've created! Chrissie x
ReplyDeletemooi hoor Maaike, alleen als rechtshandige even aanpassen aan linkshandige foto's.
ReplyDeleteBedankt voor je patroon!
ReplyDeleteLeuk patroon, je beschrijft het heel duidelijk hoor! Die wol moet ik binnenkort ook eens halen, mooi kleurverloop.
ReplyDeleteI thought they were just... amazing!
ReplyDeleteCongrats!
Gonna makes some for me, and me and me!
Thank you for all that work.
ReplyDeleteThe gloves look great.
Will give it a go.
Christy
Prachtig zoals je het patroon hebt geschreven met al die foto's! Mooi om zo een haakschema over te brengen.
ReplyDeleteIk vind je vingerloze handschoenen heel leuk! Weer inspiratie!!
Groetjes, Nelleke
I love this pattern! I wear fingerless gloves all of the time (they cover hand and wrist braces), so I need several pair to match what I am wearing on any given day. This lovely pattern looks like something that I may be able to do, and the result looks like anything but beginner or easy! The yarn you used, may I ask what kind it is? I don't remember seeing it mentioned. It is so pretty! Thank you!
ReplyDeleteMe encanta el modelo. Voy a comprar una lana adecuada y me pondré manos a la obra... Gracias por este tutorial.
ReplyDeleteUn besiño.